Prismic Preview in Next.js
This blog post is part of a series of posts on developing a blog with Next.js and Prismic. If you missed the first one you can find that here. In this post we add functionality to our blog so that you can preview unpublished posts using Prismic's excellent preview feature.
Set Up
If have been coding along in the series, we will be continuing on from where we finished up in my previous post, Google Analytics with Next.js. If you haven't been coding along to date and want to you can find code the on GitHub (you will want to start at 03). You will also find the finished code in that repository if you would like to use it as a reference.
Prismic Preview URL
So Prismic has the concept of preview, which allows you to preview your work in progress content without publishing. You just need to save it as a draft and it can be previewed. Recently they have also released a cool feature which allows you to share the preview link with anyone and it gives them access to preview your content. Now, just a heads up, we will not be implementing the shareable preview feature in this article. This is only because I choose not to ship Prismic's javascript library into production. Instead my workflow is to have a local instance of my blog running when I want to preview my work in progress posts. I will add a suggestion at the end on how you should be able to achieve this feature if you feel you need it. Ok so let's get started.
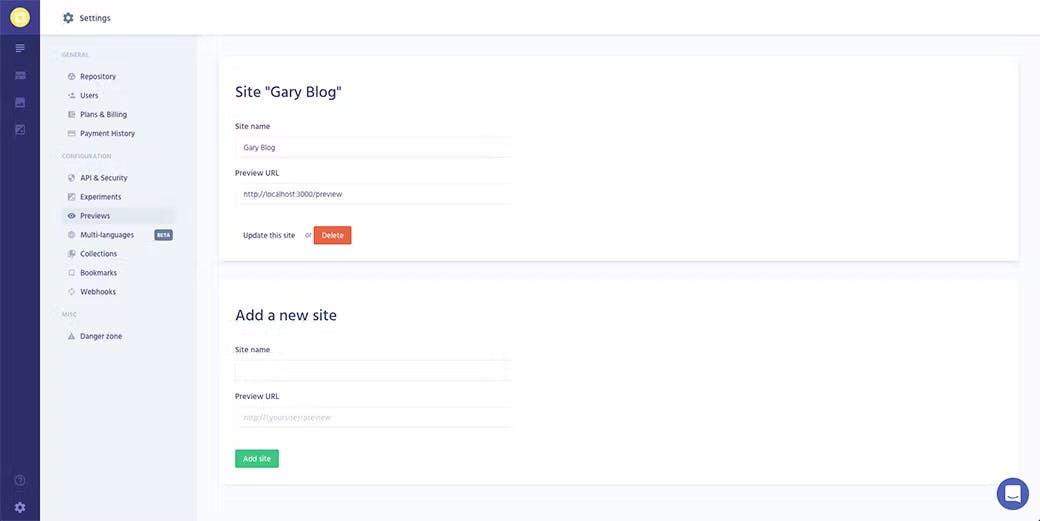
Before we get into the development, let's quickly set up our Prismic Blog preview url up. To do this, you need to log into your Prismic dashboard and head into your blog. From here navigate to settings (bottom left sidebar), here you should see a list item for "Previews", click it. You should see an option to "Add new site", enter your site name, for the Preview URL add http://localhost:3000/preview and click "Add Site". You should then have a screen that looks something along the lines of:

Prismic Javascript
Now let's set our app up to show the preview. As mentioned we are going to load the Prismic javascript library first. In your custom _document.js we are going to import our PRISMIC_API_URL.
// pages/_document.js
import { PRISMIC_API_URL } from '../config'
Then in a similar way to how we included the Google scripts on the page we are going to create a function to inject some code and create some window variables. So just before the render function add this snippet:
// pages/_document.js
setPrismic() {
    return {
      __html: `
        window.prismic = {
          endpoint: '${PRISMIC_API_URL}'
        }
      `
    };
  }
And then let's add Prismic's library and add the window variable. Just below where we added the Google scripts, let's add this one:
// pages/_document.js
// we only load this in development mode
{
  !isProduction && (
    <Fragment>
      <script dangerouslySetInnerHTML={this.setPrismic()} />
      <script
        type="text/javascript"
        src="//static.cdn.prismic.io/prismic.min.js"
      />
    </Fragment>
  )
}
Preview Route
Let's create the preview endpoint for Prismic. We are going to need to install a few more dependancies to help us get this done, so lets add those now:
yarn add cookie-parser cookies prismic-javascript next-cookies
Then in our custom server let's include these and our linkResolver while we are at it:
// server.js
const Cookies = require('cookies')
const cookieParser = require('cookie-parser')
const Prismic = require('prismic-javascript')
const { linkResolver } = require('./helpers')
Following that lets add this block of code just after where we handle the route /blog/:slug
// server.js
server.get('/preview', (req, res) => {
  const { token } = req.query
  Prismic.getApi('https://YOUR_BLOG_NAME_HERE.prismic.io/api/v2', {
    req: req,
  }).then((api) => {
    api.previewSession(token, linkResolver, '/').then((url) => {
      const cookies = new Cookies(req, res)
      cookies.set(Prismic.previewCookie, token, {
        maxAge: 30 * 60 * 1000,
        path: '/',
        httpOnly: false,
      })
      res.redirect(302, url)
    })
  })
})
I think Prismic explain what is going on in this block perfectly so I'm not going to change it, heres what they say:
- Retrieve the preview token from the token parameter in the query string
- Call the Prismic development kit with this token and the linkResolver will retrieve the correct URL for the document being previewed
- Store the preview token in the
io.prismic.previewcookie and redirect to the given URL So in summary when we click "Preview" from a work in progress blog post, it will come to our preview url with a query string which contains a token. Then this block sets it as a cookie and takes care of redirecting us to the correct location.
NOTE: You might of easily missed it, but in the url in the above block you need to update
YOUR_BLOG_NAME_HEREwith your blog name.
So we now have this endpoint, but Next.js is not aware of what we are doing here so let's stop a 404 error from happening and create a place holder page for the preview route. Let's add a new preview.js file to the pages directory and add this code:
// pages/preview.js
const Preview = () => <div>preview...</div>

export default Preview
Pulling it all Together
Now all that is left to do is grab the preview cookie value and pass it to Prismic as a ref to authenticate the preview request. First lets update our getBlogPostAPI function to accept the ref parameter. We also want to add this to the request to Prismic. Below you will find the updated function:
// api/index.js
const getBlogPostAPI = async (slug, ref = null) => {
  try {
    const API = await Prismic.api(PRISMIC_API_URL)
    const response = await API.query(
      Prismic.Predicates.at('my.blog_post.uid', slug),
      {
        ref,
      }
    )
    return response.results[0]
  } catch (error) {
    console.error(error)
    return error
  }
}
Then let's update our blogPost page to grab the cookie and pass it through to the api call. So in blogPost.js we need to import next-cookies:
import getCookies from 'next-cookies'
Then lets update getInitialProps:
// pages/blogPost.js
static async getInitialProps(context) {
  const { slug } = context.query;
  // here we use next-cookies to grab the cookies
  const cookies = getCookies(context);
  // then we grab the prismic preview cookie
  const ref = cookies['io.prismic.preview'];
  // finally we pass it trough to the api
  const response = await getBlogPostAPI(slug, ref);
  return {
    post: response
  };
}
While we are at it lets update the homepage to grab this cookie and pass it through as well. This way once it is set you will be able to see all unpublished posts. In our index.js file in the pages directory let's again import next-cookies and update getInititalProps.
// pages/index.js
import getCookies from 'next-cookies'

// ... OTHER CODE

Index.getInitialProps = async (context) => {
  const cookies = getCookies(context)
  const ref = cookies['io.prismic.preview'] || null
  const response = await getBlogPostsAPI({ pageSize: 5, ref })
  return {
    posts: response.results,
  }
}
You might be wondering two things at his point:
Do we not need to update the getBlogPostsAPI function?
Nope. If you check it out you will see that when we originally coded it, we set it up to spread any parameters we pass through.
Why are we defaulting to null in getInitialProps and we didn't in the blog post page's?
For the blog post, the getBlogPostAPI defaults it to null, but in this case we are passing through an unknown order and amount of parameters so we need to ensure it defaults to null before we pass it through.
Try it out!
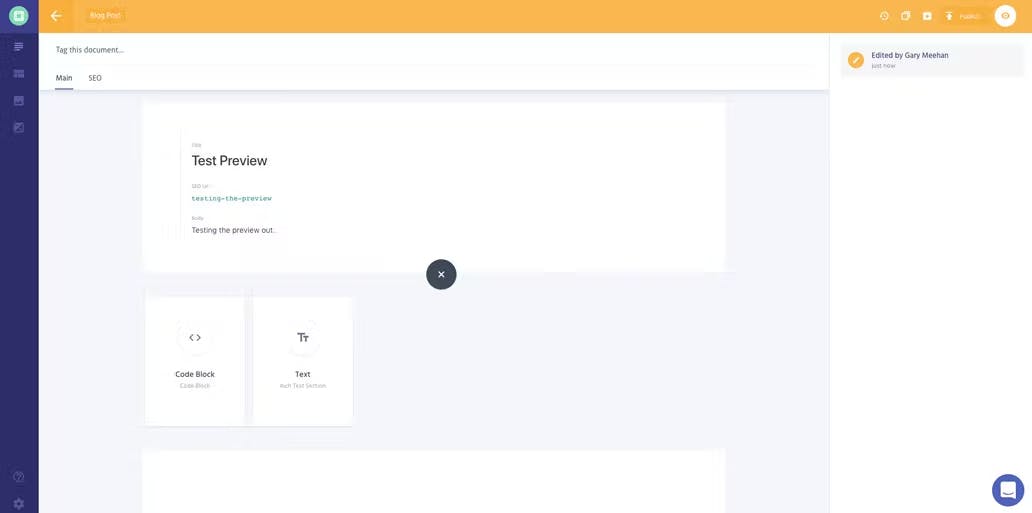
All that we need to do is try it out now. First spin you your local dev environment, yarn dev. Then head back over to your blog and create a new blog post, add a title, some text to the body and fill in the SEO tab also. (Filling in all the fields in SEO tab is important, they are required by the app) You should have something like this:

If you click on the preview icon (top right next to publish) it should now take you to your localhost, then redirect you to your blog post. If you head back to the homepage you should also the unlisted blog post in the list.
Wrapping Up
And there you have it. You can now see how your content will look locally. One of the biggest advantages I found using this is when I was developing new types of content blocks, such as code blocks, it allows you to test them out without having to publish them. In an up coming post I will be showing you how to use Prismic's slices and how to develop components for them. We will be using preview to test them out. If you got stuck along the way you can find the finished code here.
Beyond localhost
So I mentioned at the beginning that the way I set up this preview was to suit a certain workflow. I didn't like the idea of shipping an extra javascript library when I would only ever use it locally. But if you need to access preview on your live site, I would suggest removing the production check surrounding the Prismic scripts in your _document.js, also you will need to add your live sites URL rather than localhost and I think that should do the trick. You can get the shareable link when viewing a preview of your blog post. (I didn't get a chance to actually try that out so if you run into issues give me a shout).
As always if you enjoyed the post give it a share, or if you have any feedback, questions or corrections please give me a shout on Twitter.