

This blog post is part two in a series of posts on developing a blog with Next.js and Prismic. If you missed the first one you can find that here.
We will split this post into two parts:
SEO in Next.js
- Enriching SEO with Prismic
- The first part of this post is relevant to all Next.js projects.
Set Up
If you are coding along we will be continuing on from where we finished up in my previous post. If you didn't complete the first post and want to code along you can find code the on GitHub. You will also find the finished code in that repository if you would like to use it as a reference.
SEO in Next.js
Next.js exposes a built in component for us to append elements to the <head> of the page. One very important thing to note is that all tags must have a key attribute to avoid duplicate tags. Another thing to note is that the contents of <head> get cleared when unmounting the component. Bearing this in mind the approach I am going to take here is to define a custom set of SEO attributes that should be present on every page, then override the ones that are necessary. I found this a good way to ensure I have default SEO on all pages. To achieve this we will use a custom _app.js component as it gets initialised for each page.
Default SEO
Ok so let's get to it. We first need to create a new file _app.js in the pages directory and paste the code from below.
// pages/_app.js
import App, { Container } from "next/app";
import React from "react";
// here we are importing Next's custom component
// for managing the <head>
import Head from "next/head";
// We will create this object shortly
import { DEFAULT_SEO } from "../config";
export default class MyApp extends App {
  static async getInitialProps({ Component, router, ctx }) {
    let pageProps = {};
    if (Component.getInitialProps) {
      pageProps = await Component.getInitialProps(ctx);
    }

    return { pageProps };
  }

  render() {
    const { Component, pageProps } = this.props;
    return (
      <Container>
        <Head>{/* We will add meta tags here shortly */}</Head>
        <Component {...pageProps} />
      </Container>
    );
  }
}
Most of the _app.js code above is the default, we are just importing a couple of things and adding the <Head></Head> component. We are also importing a DEFAULT_SEO object, let's create this now and add the meta tags that will use it. Once we have that done I will go through what we added. Firstly in your config.js add the following:
// config.js
export const DEFAULT_SEO = {
  title: "Next.js & Prismic SEO",
  description: "SEO made easy for Next.js & Prismic",
  openGraph: {
    type: "website",
    locale: "en_IE",
    url: "https://www.garymeehan.ie",
    title: "Next.js & Prismic SEO",
    description: "SEO made easy for Next.js & Prismic",
    image:
      "https://prismic-io.s3.amazonaws.com/gary-blog%2F3297f290-a885-4cc6-9b19-3235e3026646_default.jpg",
    site_name: "GaryMeehan.ie",
    imageWidth: 1200,
    imageHeight: 1200,
  },
  twitter: {
    handle: "@garmeeh",
    cardType: "summary_large_image",
  },
};
Don't forget to update the config object with your own details :)
Now that we have that object, we can update the placeholder comment in the <Head> component of our _app.js, with the following code:
// pages/_app.js
<title key="title">{DEFAULT_SEO.title}</title>
<meta
  key="description"
  name="description"
  content={DEFAULT_SEO.description}
/>
<meta
  key="twitter:card"
  name="twitter:card"
  content={DEFAULT_SEO.twitter.cardType}
/>
<meta
  key="twitter:site"
  name="twitter:site"
  content={DEFAULT_SEO.twitter.handle}
/>
<meta
  key="og:url"
  property="og:url"
  content={DEFAULT_SEO.openGraph.url}
/>
<meta
  key="og:type"
  property="og:type"
  content={DEFAULT_SEO.openGraph.type}
/>
<meta
  key="og:title"
  property="og:title"
  content={DEFAULT_SEO.openGraph.title}
/>
<meta
  key="og:description"
  property="og:description"
  content={DEFAULT_SEO.openGraph.description}
/>
<meta
  key="og:image"
  property="og:image"
  content={DEFAULT_SEO.openGraph.image}
/>
<meta
  key="og:image:width"
  property="og:image:width"
  content={DEFAULT_SEO.openGraph.imageWidth}
/>
<meta
  key="og:image:height"
  property="og:image:height"
  content={DEFAULT_SEO.openGraph.imageHeight}
/>
<meta
  key="og:locale"
  property="og:locale"
  content={DEFAULT_SEO.openGraph.locale}
/>
Ok so you have probably seen the likes of title and description tags before, which are probably the bare minimum needed for SEO purposes. You might not have seen the Open Graph tags which are the ones that start with og:. The Open Graph protocol allows for any webpage to become a rich object in a social graph. I won't go into great detail now but if you want you can read more on it here.
What it looks like:
(Left: Facebook, Right: Twitter)
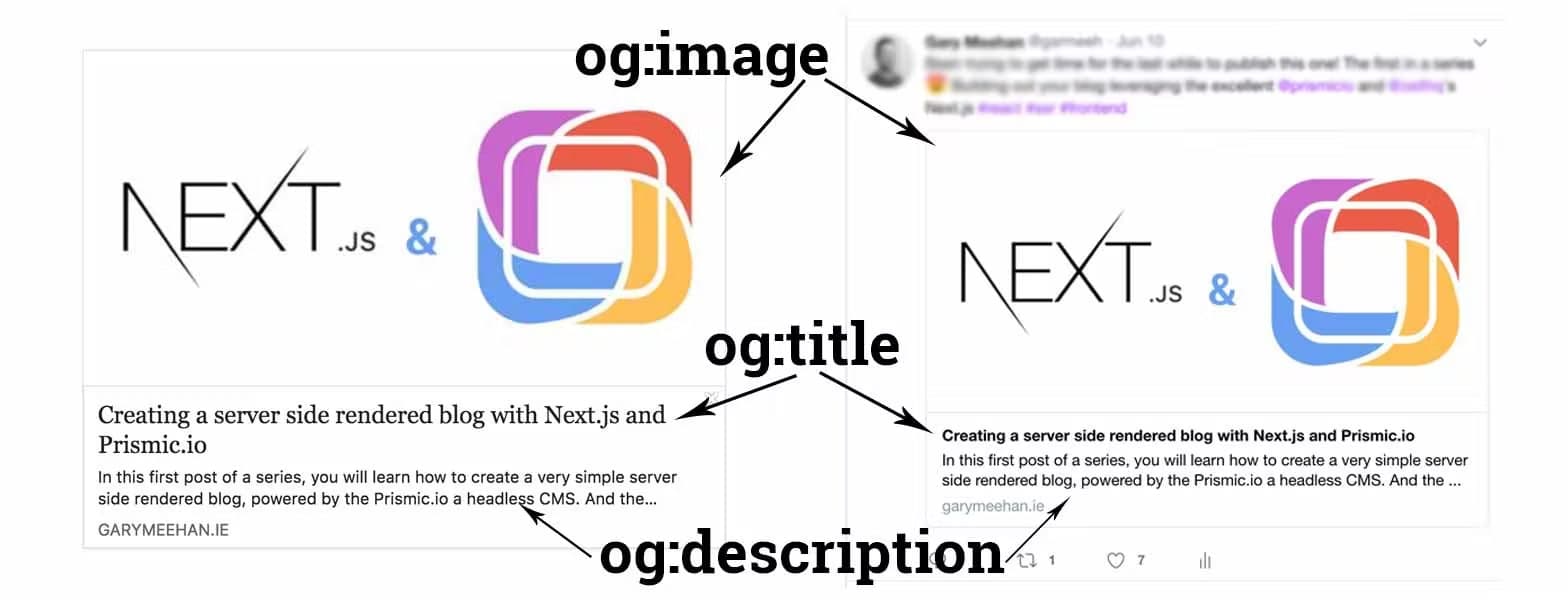
You may have noticed we are setting the height and width of the og:image tag, this is important so that Facebook can render your image the first time your page is shared, without these it will only be on the second share.
We also have a Twitter card type, we have set it to summary_large_image which you can see a preview of in the image above. For more information on the different types available check out Twitter's docs here. Twitter has it's own tags, for example it has twitter:title but there is no need to duplicate tags as Twitter will read the og:title. You can see the full list here.
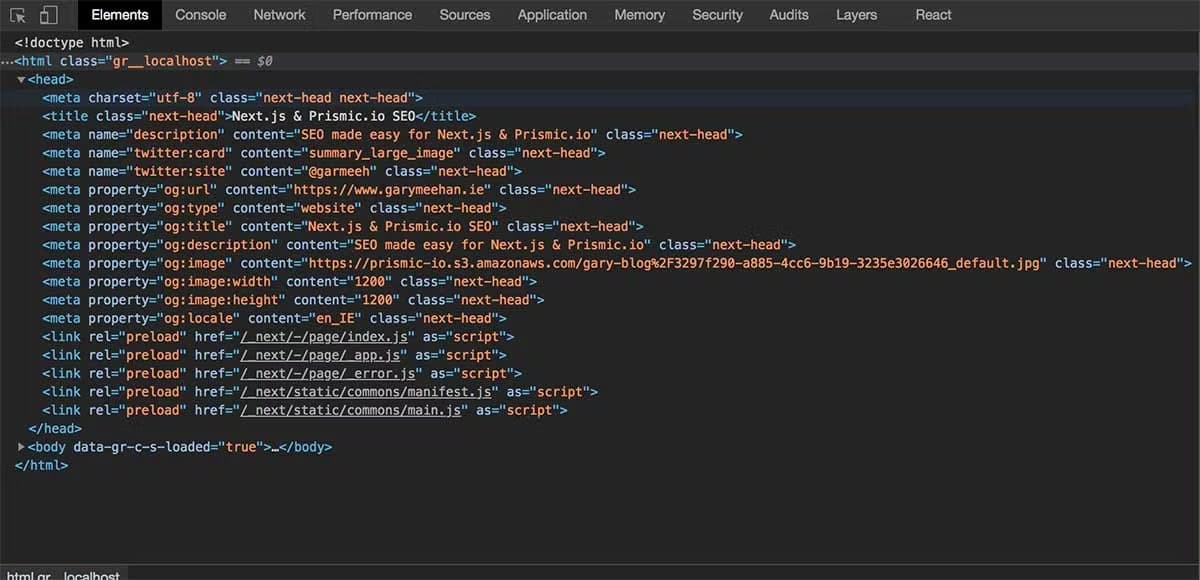
Now would be a good time to test out what we have so far. Running your app locally and inspecting the <head> element you should see all of our meta tags rendered correctly.
Blog Post SEO
Now that we have our default SEO we want to update it based on what ever blog post we are viewing. We have the bulk of the work done for this so it won't take too much effort to do. Let's open blogPost.js and add import Head from 'next/head' along side our other imports. Now we can just add the <Head> component to our render method of our blogPost.js page just after the opening of <DefaultLayout>. Within this we can add/override any tag, for example to override the <title> we would add:
// pages/blogPost.js
<Head>
  <title key="title">{post.title[0].text}</title>
</Head>
Try running the app now and you should see the page title update when you navigate to your blog post. If you want to override any more tags for the blog post, this is where you would do it.
JSON-LD
So far we have covered your basic meta tags for SEO, we also covered adding Open Graph tags to enrich your page when sharing it on social media. Next up we are going to look at enriching our blog post for Google with the help of some structured data in the form of JSON-LD. Structured data is a standardised format for providing information about a page and classifying the page content, in our case we will be classifying our blog post as an article and supplying information such as when it was published and the author. More info on structured data & type article.
Below you will find the updated code for our blog post page:
Note: If your app is running, it is expected that this code will be broken, read on to see why.
// pages/blogPost.js
import React, { Component } from "react";
import { RichText } from "prismic-reactjs";
import { getBlogPostAPI } from "../api";
import linkResolver from "../helpers";
import DefaultLayout from "../layouts";
import Head from "next/head";

export default class BlogPost extends Component {
  static async getInitialProps(context) {
    const { slug } = context.query;
    const response = await getBlogPostAPI(slug);
    return {
      post: response,
    };
  }
  // we have added a new function to return the JSON-LD
  addJSONLD(post, info, url) {
    return {
      __html: `{
      "@context": "http://schema.org",
      "@type": "BlogPosting",
      "mainEntityOfPage": {
        "@type": "WebPage",
        "@id": "${url}"
      },
      "headline": "${post.og_title[0].text}",
      "image": [
        "${post.og_image.url}"
      ],
      "datePublished": "${info.first_publication_date}",
      "dateModified": "${info.first_publication_date}",
      "author": {
        "@type": "Person",
        "name": "Gary Meehan"
      },
      "publisher": {
        "@type": "Organization",
        "name": "Gary Meehan",
        "logo": {
          "@type": "ImageObject",
          "url": "https://prismic-io.s3.amazonaws.com/gary-blog%2Fa64f6d7e-5c0e-4190-b852-2122e087ae2b_gm.jpg"
        }
      },
      "description": "${post.og_description[0].text}"
    }`,
    };
  }

  render() {
    const post = this.props.post.data;
    // we are creating two new variables here
    const info = this.props.post;
    const url = `https://www.yourdomain.ie/blog/${info.uid}`;

    return (
      <DefaultLayout>
        <Head>
          <title key="title">{post.title[0].text}</title>
        </Head>
        <article>
          <h1>{post.title.length ? post.title[0].text : ""}</h1>
          {RichText.render(post.body, linkResolver)}
        </article>
        {/* here we inject the JSON-LD from the function into a script tag  */}
        <script
          type="application/ld+json"
          dangerouslySetInnerHTML={this.addJSONLD(post, info, url)}
        />
      </DefaultLayout>
    );
  }
}
So as you can see from the comments in the code we have three new parts. First up we have the addJSONLD function which simply returns JSON-LD for a blog post. We defined some new parameters, info and url which we pass to our new function. Finally we add a script tag, with a type of application/ld+json and we add the JSON-LD here via React's dangerouslySetInnerHTML. You might of noticed if that if you try running the app it will be broken, this is expected because we have referenced some fields that we are going to set up in the next section. (Any field above starting with og are not yet created on Prismic)
Enriching SEO with Prismic
In this section we are going to take a look at a workflow I like that gives me control over how my blog posts are shared on social media and represented in Google. Head over to your Prismic account that we created in the first post and click on "Custom Types" in the left side bar, then "Blog Post" (or what ever you might have named it). From here we are going to add a new tab, you should see this option next to "Main". Let's call it SEO, and let's add some fields via the JSON editor on the right. Add the code below, hit save and we can talk about it then:
{
  "Main": {
    "title": {
      "type": "StructuredText",
      "config": {
        "single": "heading1",
        "label": "Title"
      }
    },
    "uid": {
      "type": "UID",
      "config": {
        "label": "SEO Url"
      }
    },
    "body": {
      "type": "StructuredText",
      "config": {
        "multi": "paragraph, preformatted, heading1, heading2, heading3, heading4, heading5, heading6, strong, em, hyperlink, image, embed, list-item, o-list-item, o-list-item",
        "allowTargetBlank": true,
        "label": "Body"
      }
    },
    "slices": {
      "type": "Slices",
      "fieldset": "Slice zone",
      "config": {
        "choices": {
          "code_block": {
            "type": "Slice",
            "fieldset": "Code Block",
            "description": "Code Block",
            "icon": "code",
            "display": "list",
            "non-repeat": {
              "file_name": {
                "type": "StructuredText",
                "config": {
                  "single": "heading1",
                  "label": "File Name"
                }
              },
              "code_block": {
                "type": "StructuredText",
                "config": {
                  "multi": "preformatted",
                  "label": "Code Block"
                }
              },
              "code": {
                "type": "Select",
                "config": {
                  "options": [
                    "javascript",
                    "jsx",
                    "markup",
                    "css",
                    "scss",
                    "bash",
                    "json"
                  ],
                  "label": "Code",
                  "placeholder": "Code Block Type"
                }
              }
            },
            "repeat": {}
          },
          "text": {
            "type": "Slice",
            "fieldset": "Text",
            "description": "Rich Text Section",
            "icon": "text_fields",
            "non-repeat": {
              "text": {
                "type": "StructuredText",
                "config": {
                  "multi": "paragraph, preformatted, heading1, heading2, heading3, heading4, heading5, heading6, strong, em, hyperlink, image, embed, list-item, o-list-item, o-list-item",
                  "label": "text",
                  "placeholder": "Your content here"
                }
              }
            },
            "repeat": {}
          }
        }
      }
    }
  },
  "SEO": {
    "og_title": {
      "type": "StructuredText",
      "config": {
        "single": "heading1",
        "label": "OG Title"
      }
    },
    "og_description": {
      "type": "StructuredText",
      "config": {
        "single": "embed",
        "label": "OG Description"
      }
    },
    "og_image": {
      "type": "Image",
      "config": {
        "constraint": {},
        "thumbnails": [],
        "label": "og_image"
      }
    }
  }
}
You should see something like this:
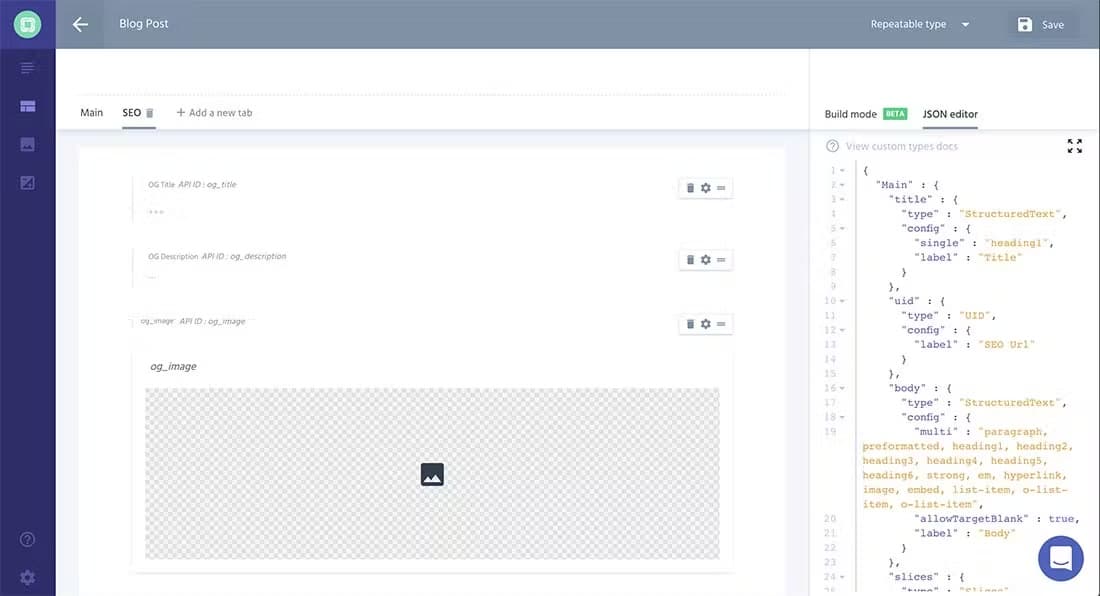
What we have just done is created three new fields that we will give us the ability to manually set our title, description and image for when our post is shared.
OG Title - Allows us to manually set the title of the page.
OG Description - Having this field allows us to set the description of the page and also the Open Graph description.
OG Image - We can now add an image that will be used by Open Graph when sharing on social media. It is important to remember here that the image should be 1200px by 1200px as this is what we defined earlier in our config.
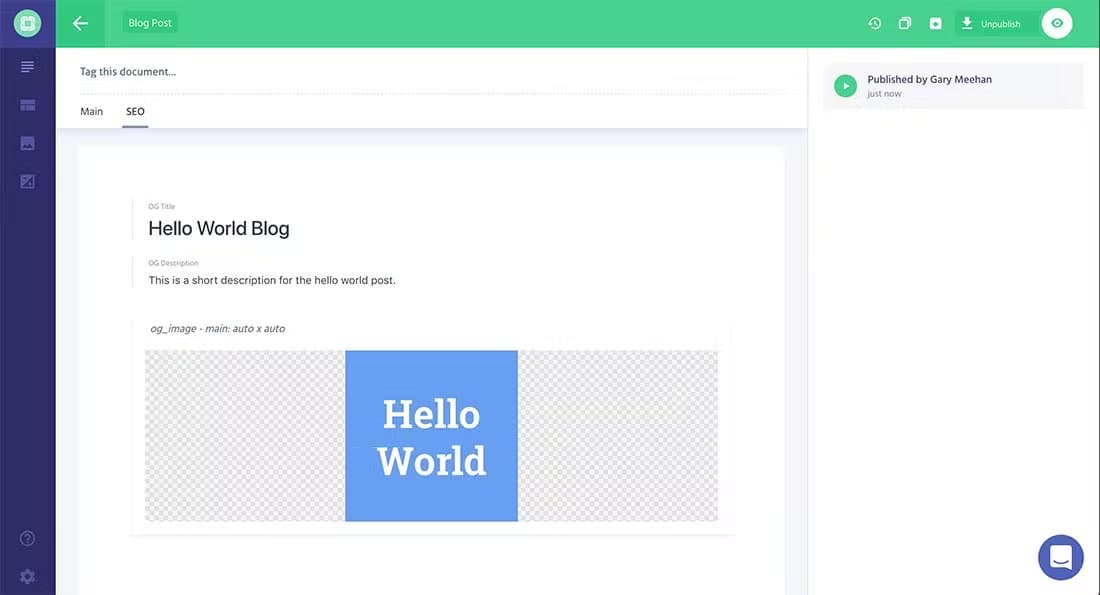
Let's put them to use. If you click on "Content" in the left sidebar and click into your blog post, you should now see an SEO tab. Click on this and fill out all the fields and publish your post. You should see something along the lines:
Tie it all in
If you remember from earlier we already have these fields referenced for the JSON-LD. All we need to do is update the <Head> to override our defaults with our newly defined information. To do this, on the blogPost.js page update the <Head> component to this:
// blogPost.js
<Head>
  <title key="title">{post.og_title[0].text}</title>
  <meta
    key="description"
    name="description"
    content={post.og_description[0].text}
  />
  <meta key="og:url" property="og:url" content={url} />
  <meta key="og:type" property="og:type" content="article" />
  <meta key="og:title" property="og:title" content={post.og_title[0].text} />
  <meta
    key="og:description"
    property="og:description"
    content={post.og_description[0].text}
  />
  <meta key="og:image" property="og:image" content={post.og_image.url} />
</Head>
All we need to do now is test it out! So let's test it out in development mode and production mode. To do this we run: yarn dev for development mode and for production we need to first build it by running yarn build followed by yarn start. If you inspect the blog post code in your browser you should now see the updated meta tags along with the JSON-LD script tag.
Two steps you could take at this point is to use a debug tool for validating your structured data, Google has one which can be found here and you can use the sharer debugger from Facebook which can be found here
Conclusion
Phew, that was a lot to take in. So in this post we have covered:
- Default SEO on all pages
- Page specific SEO
- Open Graph tags
- Adding JSON-LD to the page
- Brief intro to structured data
- Enriching your page with custom Prismic fields for SEO
This is just a taste of what we could do with each of the items covered. You could probably write a post for each of them, but hopefully this gives you an idea of where to start.
If you got this far be sure to check out this post, SEO in Next.js with next-seo, where I introduce next-seo a plug in to help with some of SEO related code we just wrote.
As always if you enjoyed the post give it a share, or if you have any feedback, questions or corrections please give me a shout on Twitter.
Read more

Deploying a Prismic and Next.js blog to Now

Prismic Preview in Next.js
Adding Prismic preview functionality to our blog so that you can preview unpublished posts. Excellent for when developing new features or content types.

SEO in Next.js with next-seo
Brief introduction to next-seo a new plugin for making SEO easier in Next.js projects. In this post we walk through adding it to a Hello World app.