SEO in Next.js with next-seo
IMPORTANT: Since this post was written Next SEO released many new versions. So the example below is a little outdated. You can view the updated plugin and documentation here. The principals of the plugin mostly remain the same so if your interested it would be worth reading the example at least.
Recently I have been working a lot with Next.js and found myself wanting a simpler way of setting/updating SEO related meta tags. Next.js makes it easy to set and update these with the use of it's <Head> component, but you still had to know which tags to set and override. In each project I was doing I was setting up the same tags over and over. To try reduce this I decided to create the plug-in next-seo.
For now the next-seo just covers some basic tags such as <title> and some Open Graph tags. I am currently working on the road map for it and hope to incorporate the likes of JSON-LD, extend the social media element and greatly improve the documentation in the near future. In the rest of this post we look at adding next-seo to Next.js's Hello World example.
Example:
Ok let's get started by creating a new Hello World app by running the following commands:
npx create-next-app --example hello-world next-seo-example
cd next-seo-example
Then we can install next-seo:
yarn add next-seo@0.0.7
Next up we want to leverage Next.js's custom _app.js. The goal here is that we set some default SEO attributes that will be rendered on every page. Then we can override specific ones as needed on any page without needing to redeclare the defaults. The _app.js is initialised on every page.
Let's create a new file in the pages directory and name it _app.js. Then paste the code below:
//  pages/_app.js
import App, { Container } from 'next/app'
import React from 'react'
// we import the plugin
import NextSeo from 'next-seo'

// let's create a configuration for next-seo
const DEFAULT_SEO = {
  title: 'Next.js SEO Plugin',
  description: 'SEO made easy for Next.js projects',
  openGraph: {
    type: 'website',
    locale: 'en_IE',
    url: 'https://www.garymeehan.ie',
    title: 'Next.js Seo',
    description: 'SEO made easy for Next.js projects',
    image:
      'https://prismic-io.s3.amazonaws.com/gary-blog%2F3297f290-a885-4cc6-9b19-3235e3026646_default.jpg',
    site_name: 'GaryMeehan.ie',
    imageWidth: 1200,
    imageHeight: 1200,
  },
  twitter: {
    handle: '@garmeeh',
    cardType: 'summary_large_image',
  },
}

export default class MyApp extends App {
  static async getInitialProps({ Component, router, ctx }) {
    let pageProps = {}
    if (Component.getInitialProps) {
      pageProps = await Component.getInitialProps(ctx)
    }

    return { pageProps }
  }

  render() {
    const { Component, pageProps } = this.props
    return (
      <Container>
        {/* Then we pass the config to the plugin */}
        <NextSeo config={DEFAULT_SEO} />
        <Component {...pageProps} />
      </Container>
    )
  }
}
There are only a few small additions in this code from the default _app.js.
Break Down
What we are doing above is including next-seo, then we declare a configuration object before call <NextSeo /> and passing the configuration to it. Ok let's break down what get's rendered based on this configuration object. title & description will render there respected meta tags. Both the openGraph and twitter object will render tags based on Open Graph. The Open Graph protocol allows for any webpage to become a rich object in a social graph. I won't go into great detail now but if you want you can read more on it here. One thing to note is that the image width and height is important to declare and adhere to, as it will specify the image dimensions to the crawler so that it can render the image immediately without having to asynchronously download and process it.
Overriding
Ok so now that we have the defaults in place, lets override the title for the about page. If we open up about.js and replace it with the following code snippet:
// pages/about.js
import NextSeo from 'next-seo'

export default () => (
  <div>
    <NextSeo
      config={{
        title: 'About us',
        description: 'Updated description as well',
      }}
    />
    About us
  </div>
)
In this case we are not passing a full object to the <NextSeo />, we are only passing a custom object and defining title and description. This will result in the title and description meta tags being updated and all our previous ones remaining the same.
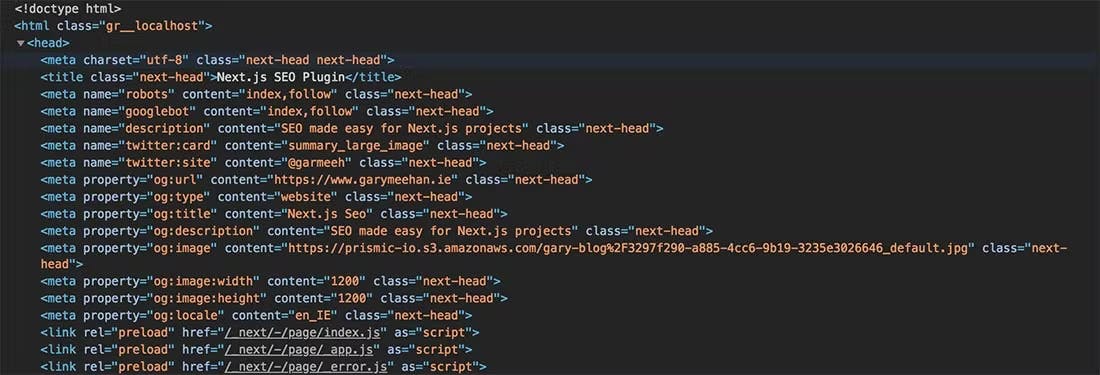
To test it all out run yarn dev and navigate to http://localhost:3000/ in your browser. If you inspect your homepage <head> tag you should see:

Then when you navigate to the about page if you inspect again you should see that the title and description has been updated.
And there you have it, a quick introduction to next-seo. As I mentioned above this is still a work in progress and I will be continuing to improve it over the coming weeks. If you have any suggestions or would like to help out you can find me on Twitter or check out next-seo on GitHub.